
Measuring angles in roof construction is crucial for a stable structure. Accurate measurements ensure safety and efficiency in building.
Roof construction involves many precise calculations. Measuring angles is a key part of this process. This ensures the roof fits perfectly and is strong. Builders use different tools and methods for this task. Understanding these techniques can save time and prevent mistakes.
In this blog, we will explore how to measure angles in roof construction. This guide will help you understand the basics and importance of accurate angle measurement in roofing projects. Whether you are a beginner or have some experience, this information is valuable. Let’s dive in and learn how to measure angles correctly.

Credit: www.pinterest.com
Basics Of Roof Angles
Understanding the basics of roof angles is crucial in roof construction. Roof angles determine how water drains and how much space is available inside the attic. Learning to measure these angles correctly ensures a durable and safe roof structure.
Pitch And Slope
Pitch and slope are terms often used in roofing. They help describe the steepness of a roof.
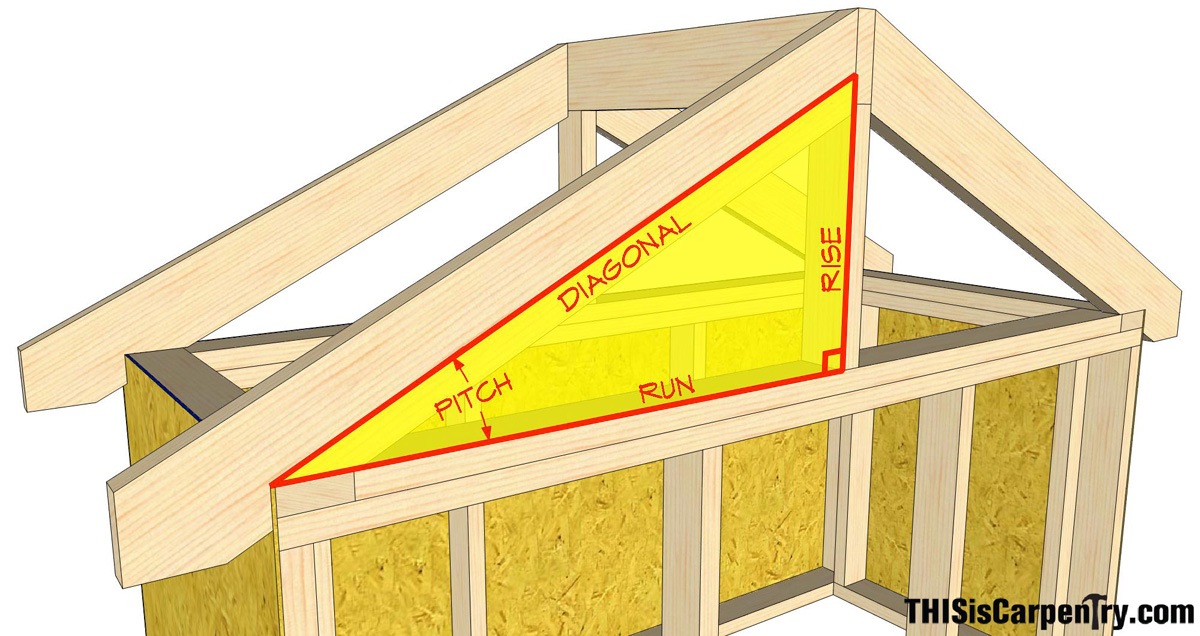
The pitch of a roof is the ratio of the vertical rise to the horizontal span. It is usually expressed as a fraction. For example, a roof that rises 4 inches for every 12 inches of horizontal run has a pitch of 4/12. This measurement is essential for understanding the roof’s steepness.
On the other hand, the slope is expressed as an angle. It is measured in degrees. To calculate the slope, you can use a simple formula. Divide the rise by the run and then use an arctangent function.
Common Roof Types
There are various common roof types, each with different angles and characteristics. Gable roofs are one of the most common types. They have two sloping sides that meet at a ridge, forming a triangle.
Hip roofs have slopes on all four sides. These sides meet at a peak or a ridge. Hip roofs are known for their stability and ability to withstand strong winds.
Flat roofs have a very low pitch. They appear almost level. Despite their name, flat roofs still need a slight slope for water drainage.
Mansard roofs have four sides, with two slopes on each side. The lower slope is steeper than the upper slope. This design provides extra living space under the roof.
Each roof type requires careful angle measurement. Knowing the basics of these angles ensures a well-constructed and functional roof.
Tools For Measuring Angles
In roof construction, accurately measuring angles is crucial. It ensures the structure’s safety and longevity. Using the right tools can make this task easier and more precise. Below are some essential tools for measuring angles in roof construction.
Protractors
Protractors are basic tools for measuring angles. They are easy to use. Simply align one edge with the base of the angle. The protractor’s scale will show the angle’s degree. Some protractors have a pivoting arm. This feature helps in measuring difficult angles. They come in various sizes and materials. Choose a durable one for construction work.
Angle Finders
Angle finders are more advanced. They provide digital readings. This makes them very accurate. Place the angle finder on the roof’s surface. It will display the angle on a screen. Some models can store measurements. This feature helps in complex projects. Angle finders are easy to use. They are ideal for precise work.
Using A Protractor
Using a protractor is a common method to measure angles in roof construction. It provides accurate results when used correctly. This tool is simple and effective for both professionals and DIY enthusiasts. Understanding how to use a protractor can make your roofing projects more precise.
Step-by-step Guide
First, gather your materials. You will need a protractor and a pencil. Stand at the edge of the roof. Align the base of the protractor with the roof edge. Make sure the midpoint of the protractor is at the corner of the roof. This is where the roof angle starts.
Next, rotate the protractor until its base is parallel with the roof’s slope. Read the angle where the roof line meets the protractor’s scale. Mark this angle with your pencil for future reference.
Tips For Accuracy
Ensure your protractor is not damaged. A bent or broken protractor can give wrong readings. Use a sturdy ladder or scaffolding to avoid wobbles. Stability is key for accurate measurements.
Take your time. Rushing can lead to mistakes. Double-check your alignment before reading the angle. If possible, get a second opinion. Another set of eyes can help verify your measurements.
Credit: www.thisiscarpentry.com
Using An Angle Finder
Hey friends, roof construction can be tricky, especially when it comes to measuring angles. But don’t worry, there’s a tool that makes this task much easier: the angle finder. Whether you’re a seasoned pro or a DIY enthusiast, using an angle finder can save you time and ensure accuracy. Let’s dive into how to use this handy tool effectively.
Digital Vs. Manual
When it comes to angle finders, you have two main options: digital and manual. Both have their pros and cons.
Digital angle finders are modern and easy to read. They display the angle on a screen, which can be very precise. Plus, they often come with additional features like memory storage and backlighting. This makes them great for working in low-light conditions.
Manual angle finders are simple and reliable. They usually consist of two arms that you adjust to measure the angle. While they may not have the extra features of digital models, they don’t require batteries and are often more durable.
So, which one should you choose? It depends on your needs and preferences. If you like technology and want precise measurements, go for a digital angle finder. If you prefer simplicity and reliability, a manual angle finder is a great choice.
Best Practices
Now that you know the types of angle finders, let’s talk about how to use them effectively. Here are some best practices:
- Read the instructions: Before using your angle finder, take a few minutes to read the manual. This will help you understand its features and how to use it correctly.
- Keep it clean: Dirt and debris can affect the accuracy of your measurements. Make sure your angle finder is clean before each use.
- Check the calibration: Over time, your angle finder might lose its accuracy. Regularly check and recalibrate it if necessary.
- Use a steady hand: When measuring, hold the angle finder steady. A shaky hand can lead to inaccurate readings.
- Measure twice: To ensure accuracy, take the measurement twice. This way, you can double-check your results.
Following these best practices will help you get the most accurate measurements, making your roof construction project a breeze.
Recently, I tried using a digital angle finder for a small roofing project at home. It was a game-changer! The digital display made it super easy to read the angles, and I finished the job much faster than expected. So, give it a try, and you might find it just as helpful!
Remember, whether you choose a digital or manual angle finder, the key is to use it correctly. Happy measuring!
Calculating Roof Pitch
Hey there, aspiring builders! Today, we’re diving into the basics of calculating roof pitch. Whether you’re planning to build a new shed or renovate your house, understanding roof pitch is essential. Trust me, it’s simpler than it sounds. You just need to know a few key concepts, and you’ll be good to go.
Rise Over Run
First things first, let’s talk about rise over run. Think of it as the slope of your roof. Imagine you’re standing at the bottom of a hill. The rise is how high the hill goes, and the run is how far the hill stretches on the ground. In roof terms, the rise is the vertical height of your roof, and the run is the horizontal distance.
Here’s how to calculate it:
- Measure the vertical rise of your roof. This is how tall it is from the base to the peak.
- Measure the horizontal run. This is how far it extends horizontally.
- Divide the rise by the run. This gives you the pitch.
For example, if your roof rises 4 feet for every 12 feet of run, the pitch is 4/12, which simplifies to 1/3.
Pitch Conversion Chart
Not everyone likes fractions. That’s where a pitch conversion chart comes in handy. It’s a quick reference that shows common pitches in different formats. So, you can convert that 1/3 into degrees or percentages.
Check out this simple pitch conversion chart:
| Pitch (Fraction) | Pitch (Degrees) | Pitch (Percentage) |
|---|---|---|
| 1/12 | 4.76° | 8.33% |
| 2/12 | 9.46° | 16.67% |
| 4/12 | 18.43° | 33.33% |
| 6/12 | 26.57° | 50.00% |
| 8/12 | 33.69° | 66.67% |
Pretty cool, right? This chart helps you understand different pitches at a glance. So, next time you’re working on a project, you can quickly see what pitch you’re dealing with.
There you have it! Calculating roof pitch is as easy as pie. Just remember the rise over run, and keep a pitch conversion chart handy. Happy building!
Measuring Complex Roofs
Hey friends, today we are going to dive into the world of measuring complex roofs. Roofing can be tricky, especially when you’re dealing with roofs that have multiple sides or intersecting parts. But don’t worry, I’ve got your back. In this section, I’ll show you how to measure angles in complex roofs. We’ll break it down step-by-step, so it’s easy to follow along. Ready? Let’s get started.
Multi-sided Roofs
Multi-sided roofs are like octagons or hexagons in shape. They look cool, but measuring them can be a bit confusing. Here’s a simple way to do it:
- First, draw a rough sketch of the roof.
- Identify all the sides and corners.
- Use a protractor to measure each angle at the corners.
- Add up all the angles. They should total to a specific number, depending on the shape:
- Hexagon: 720 degrees
- Octagon: 1080 degrees
- If they don’t add up, recheck your measurements.
Simple, right? Now, let’s move on to something a bit more challenging.
Intersecting Roofs
Intersecting roofs are when two or more roof sections meet. This can be a real headache, but I have a trick for you.
- Draw a clear sketch of how the roofs intersect.
- Identify the intersecting lines.
- Measure each angle where the roofs meet using a protractor.
- It’s like connecting the dots. One angle leads to another.
Here’s an example to make it clearer. Imagine you have a T-shaped roof. You measure the angles where the two roofs meet at the center. Each intersection can be broken down into smaller, manageable parts.
Remember, the key is to break it down into smaller sections. It’s just like solving a puzzle. Piece by piece.
And there you have it, friends. Measuring complex roofs doesn’t have to be a nightmare. Just take it step-by-step and you’ll be a pro in no time.
Safety Precautions
Hey friends, today we’re talking about how to measure angles in roof construction. But first, let’s discuss something very important: safety precautions. When you’re working on a roof, there are risks involved. So, it’s crucial to stay safe. Trust me, you don’t want to end up in the emergency room. Let’s dive into the two main safety aspects: equipment safety and working at heights.
Equipment Safety
Before you even think about climbing onto the roof, make sure your equipment is in good shape. This is not the time to be lazy. I once ignored a small crack in my ladder, and guess what? It broke. I was lucky to escape with just a bruise. So, check everything.
- Inspect your ladder: Make sure it’s stable and has no damage.
- Check your tools: Are they working properly? Are they clean?
- Wear the right gear: Helmets, gloves, and non-slip shoes are a must.
Taking these steps can prevent accidents. Better safe than sorry, right?
Working At Heights
Now, let’s talk about working at heights. This is where things can get a bit scary. If you’re afraid of heights, take it slow. But even if you’re not, you need to be careful. Falling off a roof is no joke.
- Use a safety harness: This can save your life. Make sure it’s securely fastened.
- Never work alone: Always have someone nearby. In case something happens, you’ll need help immediately.
- Watch the weather: Don’t work on the roof if it’s windy, rainy, or icy. Slippery surfaces are dangerous.
By following these steps, you’re more likely to stay safe. I remember one time, I was working on a roof during a sunny day, and out of nowhere, it started raining. I almost slipped. Lesson learned. Always check the weather forecast.
So, there you have it. Safety first, always. Now you can measure those angles with confidence, knowing you’re well-prepared. Stay safe, and happy building!
Credit: www.thisiscarpentry.com
Common Mistakes To Avoid
Measuring angles in roof construction is crucial. But, it’s also easy to make mistakes. These mistakes can lead to big problems. Let’s look at common errors and how to avoid them.
Incorrect Tool Usage
Using the wrong tools is a common mistake. It’s like trying to eat soup with a fork. You need the right tool for the job. In roof construction, the right tools include:
- Protractors: Simple but effective for basic angle measurements.
- Angle finders: Handy for more precise measurements.
- Laser levels: Great for ensuring accuracy over larger distances.
Using the wrong tool can give you incorrect measurements. I once used a simple ruler to measure an angle. Big mistake! Always check you’re using the right tool for the task.
Misreading Measurements
Misreading measurements is another common error. It’s like reading a map wrong and getting lost. To avoid this, remember:
- Double-check your readings: It’s easy to misread numbers, especially in a hurry. Take your time.
- Use clear markings: If your tool has faded or unclear markings, replace it.
- Keep tools steady: Moving tools while measuring can change the reading.
I once misread a measurement and ended up with a crooked roof. Not fun! Double-checking can save you from these costly mistakes.
Frequently Asked Questions
How Do You Measure The Angle Of A Roof?
To measure the angle of a roof, use a protractor or an angle finder. Place it along the roof’s slope. Alternatively, measure the rise and run, then use trigonometry to calculate the angle.
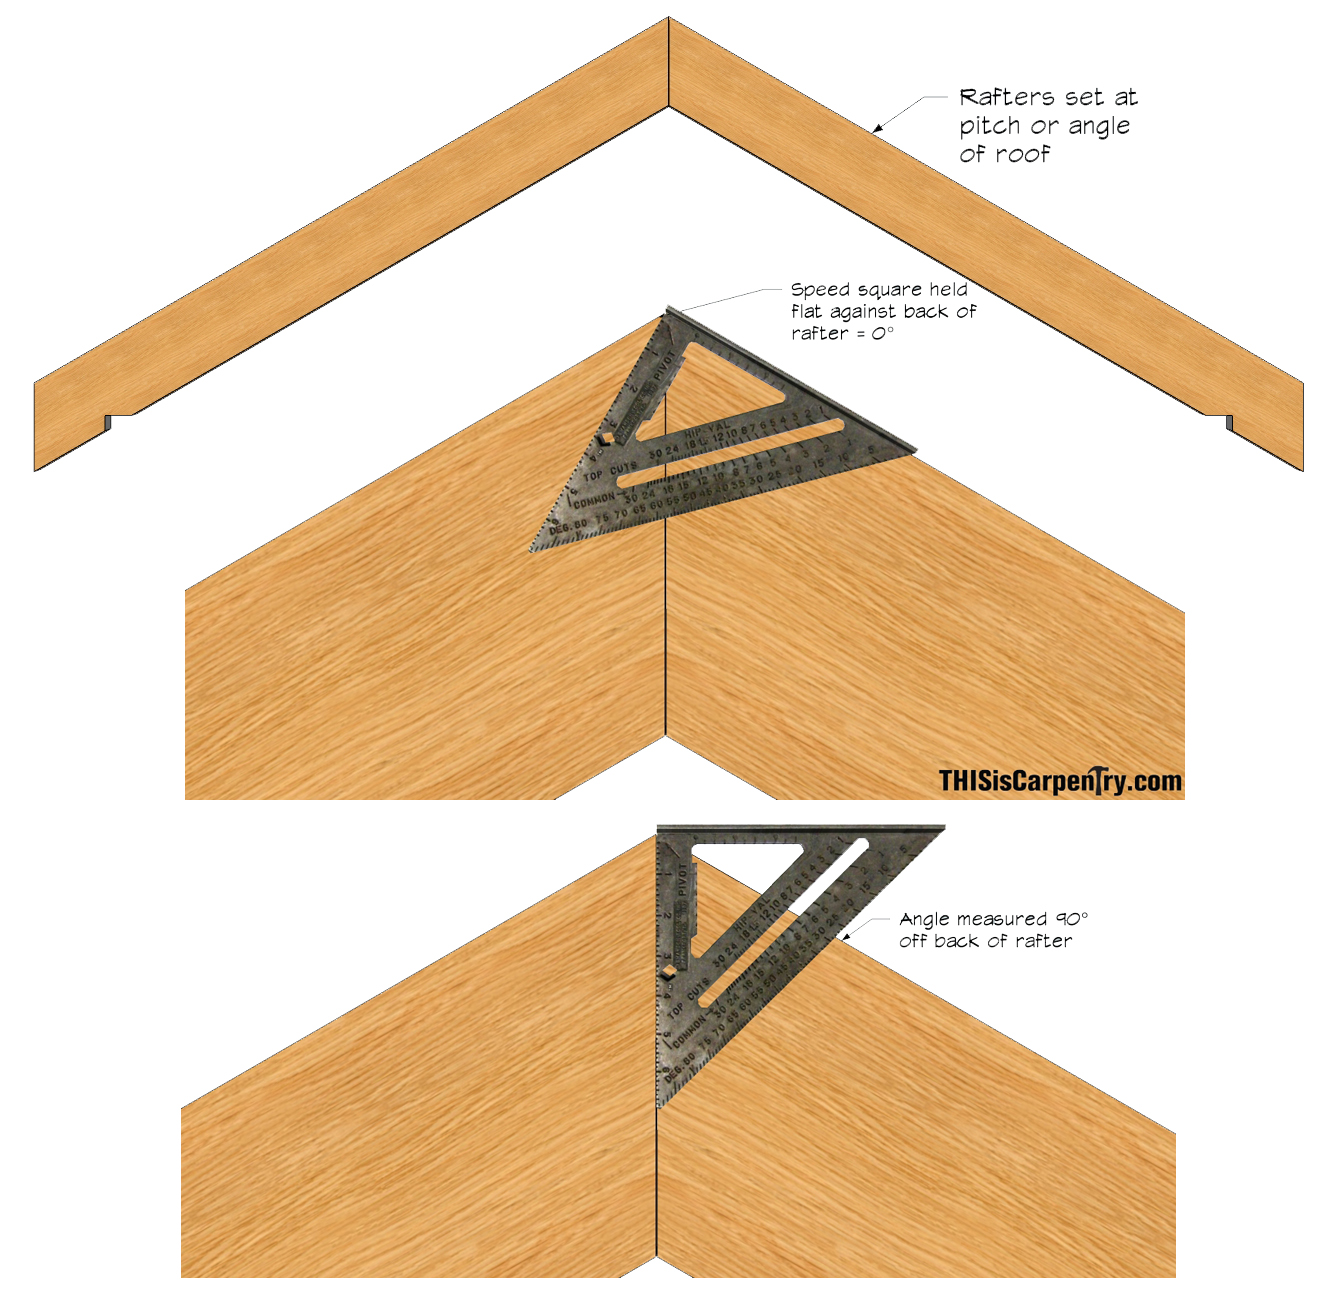
How To Figure Out Angles For Rafters?
To figure out rafter angles, use a framing square or an online rafter angle calculator. Measure the rise and run, then use trigonometry or the calculator to determine the angle. This ensures accurate cuts and proper roof alignment.
How Do You Measure Angles In Construction?
Measure angles in construction using tools like protractors, angle finders, or digital angle gauges. These tools ensure precise measurements. Always double-check for accuracy.
What Is The Angle Of A 12×12 Roof?
A 12×12 roof has a 45-degree angle. This is because the roof’s rise and run are equal.
Conclusion
Accurately measuring roof angles is crucial for a solid construction. Use the right tools and methods to ensure precision. Practice these techniques to gain confidence. Understanding roof angles helps prevent errors and saves time. Remember, careful measurements lead to a sturdy, safe roof.
So, keep these tips in mind for your next roofing project. Happy building!

Rakib Sarwar is a seasoned professional blogger, writer, and digital marketer with over 12 years of experience in freelance writing and niche website development on Upwork. In addition to his expertise in content creation and online marketing, Rakib is a registered pharmacist. Currently, he works in the IT Division of Sonali Bank PLC, where he combines his diverse skill set to excel in his career.