
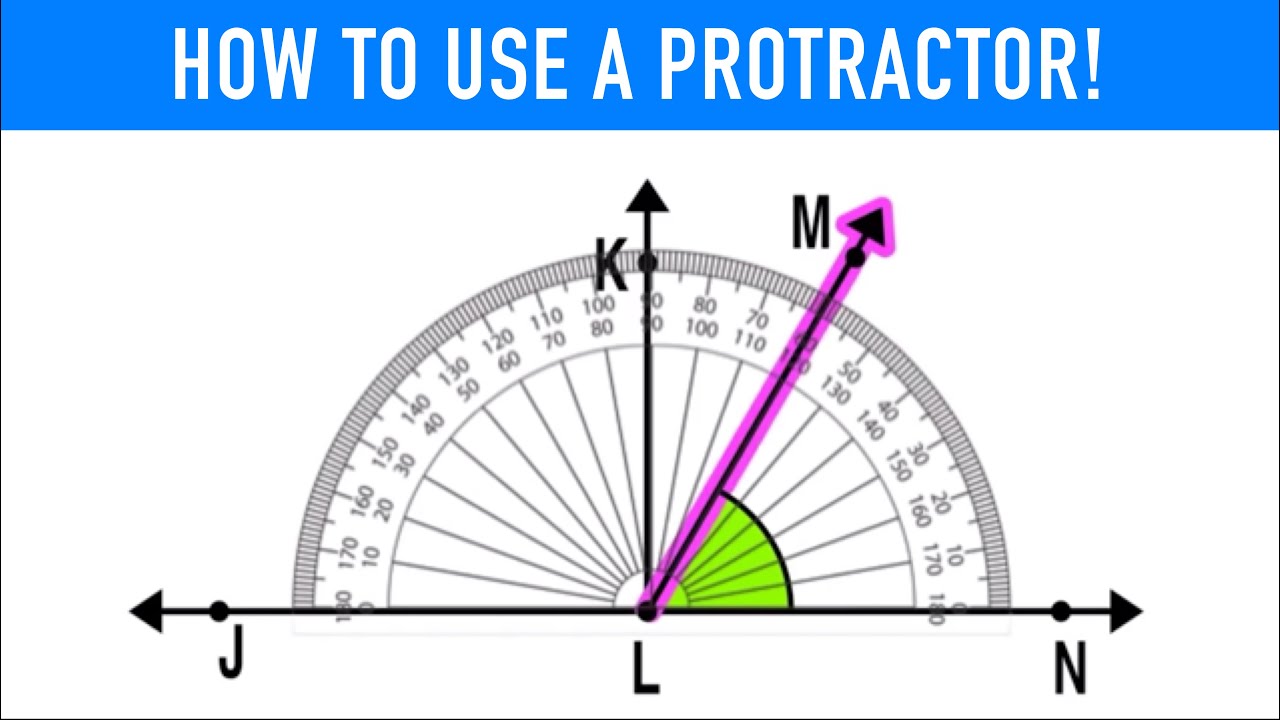
To measure angles using a protractor, you need to align the tool correctly. Place the protractor’s center on the angle’s vertex.
Then, read the measurement where the angle’s side intersects the protractor’s scale. Measuring angles is a crucial skill in many fields, from geometry to engineering. Using a protractor may seem tricky at first, but it becomes straightforward with practice. A protractor is a simple tool that helps you find the exact angle between two lines.
Whether you’re a student, teacher, or hobbyist, knowing how to use a protractor correctly can save you time and improve your accuracy. Let’s explore the steps to measure angles with ease and confidence.

Credit: www.homeschoolmath.net
Introduction To Protractors
Protractors are common tools in mathematics. They measure angles. Understanding how to use them is essential. This skill helps in geometry, construction, and various other fields. Let’s start with the basics.
What Is A Protractor?
A protractor is a measuring instrument. It measures angles in degrees. The most common type is a half-circle. It has a base and a curved edge. The curved edge is marked from 0 to 180 degrees. The base is used to align the protractor with one side of the angle.
Types Of Protractors
Protractors come in different types. Each type has specific uses.
The semi-circular protractor is the most common. It measures angles up to 180 degrees. It is used in schools and basic geometry tasks.
The full-circle protractor measures a complete circle. It ranges from 0 to 360 degrees. It is used in more advanced fields like engineering.
The adjustable protractor is another type. It has a rotating arm. This allows more precise measurements. It is used in technical drawing and drafting.
Digital protractors are modern tools. They provide digital readings of angles. They are used in professional and technical fields. They are more accurate and easy to read.
Each type of protractor serves a purpose. Knowing which one to use is important. It depends on the task and the level of precision needed.
Parts Of A Protractor
Understanding the parts of a protractor is key to measuring angles accurately. A protractor is a simple yet essential tool. It consists of several parts that you need to know. Each part plays a role in the process of measuring angles. In this section, we will explore the key parts of a protractor: Base Line, Center Point, and Degree Markings.
Base Line
The base line is the straight edge of the protractor. It is usually positioned at the bottom. The base line is used to align the protractor with the angle’s vertex. It helps ensure that your measurements are precise. Make sure the base line is perfectly aligned with one side of the angle.
Center Point
The center point is located in the middle of the base line. It is often marked with a small hole or a dot. The center point is where you place the vertex of the angle. This ensures the protractor is correctly positioned. Accurate placement of the center point is crucial for correct measurements.
Degree Markings
Degree markings are the numbers along the curved edge of the protractor. They range from 0 to 180 degrees. These markings help you determine the measure of the angle. Each degree marking corresponds to a specific angle. Read the degree markings carefully to get the correct measurement.
Preparing For Measurement
Measuring angles with a protractor is a fundamental skill in geometry. Proper preparation ensures accurate measurements. This section will guide you through the necessary steps before measuring an angle.
Gathering Materials
First, gather all the materials needed. You will need a protractor, a pencil, and a ruler. Ensure the protractor is clear and easy to read. A simple protractor works best for beginners.
Positioning The Protractor
Next, position the protractor correctly. Place the protractor’s midpoint at the angle’s vertex. Ensure the baseline of the protractor aligns with one side of the angle. This alignment is crucial for an accurate reading.
Keep the protractor steady and avoid any movement. This stability helps in getting precise measurements. Now, you are ready to measure the angle.
Measuring An Angle
Hey friends, today we’re diving into something super handy – measuring angles using a protractor. It’s easier than you think! Whether you’re working on a school project, doing some DIY at home, or just curious about angles, a protractor is your go-to tool. Let’s break it down step-by-step.
Aligning The Protractor
First things first, you need to align your protractor correctly. Here’s how to do it:
- Place the protractor: Put the protractor on the paper. Make sure the flat edge is along one side of the angle.
- Center the vertex: The little hole in the middle of the protractor? That’s called the vertex. Place it exactly on the angle’s vertex (the point where the two lines meet).
- Line up the baseline: Line up one arm of the angle with the zero line on the protractor. This is super important for accuracy.
Got it aligned? Great! You’re halfway there.
Reading The Degree
Now, let’s read the degree of the angle. It’s simpler than it sounds.
- Find the other arm: Look at where the other arm of the angle crosses the numbers on the protractor.
- Read the number: The number closest to where the arm crosses the protractor is your angle’s measure. If the arm crosses between two numbers, estimate the angle. For example, if it’s between 30 and 40, it might be around 35 degrees.
- Double-check: Ensure your protractor hasn’t moved and the vertex is still correctly placed. Double-checking helps avoid mistakes.
And there you have it! You’ve measured an angle. Easy, right?
When I first learned to use a protractor, I was super nervous. But trust me, with a bit of practice, it becomes second nature. So grab a protractor and give it a try!
Measuring Different Types Of Angles
Understanding how to measure different types of angles is important. Using a protractor makes this task easy and accurate. This section explains how to measure acute, right, and obtuse angles.
Acute Angles
An acute angle is less than 90 degrees. To measure an acute angle with a protractor, follow these steps. Place the midpoint of the protractor on the angle’s vertex. Align one side of the angle with the zero line of the protractor. Read the number on the protractor where the other side of the angle crosses the scale. This number is the measure of the acute angle.
Right Angles
A right angle is exactly 90 degrees. Measuring a right angle is simple. Place the midpoint of the protractor on the vertex of the angle. Align one side of the angle with the zero line of the protractor. The other side should cross at 90 degrees. If it does, you have a right angle.
Obtuse Angles
An obtuse angle is more than 90 degrees but less than 180 degrees. To measure an obtuse angle, use these steps. Place the midpoint of the protractor on the vertex of the angle. Align one side of the angle with the zero line of the protractor. Read the number where the other side crosses the scale. This number is the measure of the obtuse angle.
Credit: www.youtube.com
Common Mistakes To Avoid
Measuring angles with a protractor seems simple. Yet, many make common mistakes that lead to inaccurate readings. Understanding these mistakes helps ensure precise measurements. Here are some frequent errors and how to avoid them.
Incorrect Placement
One common mistake is placing the protractor incorrectly. Ensure the protractor’s midpoint aligns with the angle’s vertex. The baseline of the protractor should align with one side of the angle. Misalignment leads to incorrect measurements.
Misreading The Scale
Misreading the scale is another frequent error. Protractors have two sets of numbers. One set reads from 0 to 180 degrees clockwise. The other reads from 0 to 180 degrees counterclockwise. Choose the correct scale based on the angle’s opening direction. Always double-check the scale to avoid mistakes.
Practice Exercises
Hey friends, today we’re diving into some practice exercises for measuring angles using a protractor. This will help you get comfortable with the tool and improve your skills. We’ll start with simple angles and move on to more complex ones. Let’s get started!
Simple Angle Measurements
First up, let’s tackle some basic angles. These are the ones you’ll encounter most often. They are straightforward and a great way to build your confidence.
- Step 1: Place the protractor’s midpoint on the vertex of the angle.
- Step 2: Align one side of the angle with the zero line of the protractor.
- Step 3: Read the number where the other side crosses the protractor.
For example, if you have an angle that opens to the right and aligns with the zero line at the bottom, simply look where the other side points. If it crosses at 45 degrees, then you have a 45-degree angle. Easy, right?
Complex Angle Measurements
Now, let’s move on to more complex angles. These might be a bit tricky, but practice makes perfect. Follow these steps:
- Step 1: Just like before, place the midpoint of the protractor on the vertex.
- Step 2: Ensure one side of the angle is aligned with the zero line.
- Step 3: If the angle is larger than 180 degrees, you might need to measure in parts.
- Step 4: Measure the first part and then the second part. Add them together to get the total angle.
For instance, if you have an angle that is 250 degrees, measure the first 180 degrees, then measure the remaining part which is 70 degrees. Add them together, and you have your total angle. Simple, yet effective.
Remember, practice is key. The more you measure, the better you get. So grab a protractor and start measuring those angles. You’ll be a pro in no time!

Credit: study.com
Applications Of Protractors
Protractors are essential tools for measuring angles accurately. They find use in various fields, making them versatile and indispensable. This section explores the different applications of protractors in education, engineering, and art and design.
In Education
Protractors are crucial in classrooms for teaching geometry. Students learn to measure and understand angles. These tools help visualize concepts better. They make abstract ideas tangible. Teachers use them to demonstrate real-world applications of math. Students engage more when they can see and measure angles themselves.
In Engineering
Engineers rely on protractors for precision. They use them in drafting and design. Accurate angle measurement is vital in construction. Bridges, buildings, and machinery depend on precise angles. Protractors ensure every component fits perfectly. This prevents costly mistakes and ensures safety.
In Art And Design
Artists and designers use protractors to create accurate works. They help in drawing and designing with precise angles. This is important in technical drawing and graphic design. A well-measured angle can make or break a design. Protractors aid in creating symmetry and balance in artwork. They are tools that blend creativity with accuracy.
Frequently Asked Questions
How Do You Measure Angles With A Protractor?
Place the protractor’s midpoint on the angle’s vertex. Align one side with the zero line. Read the degree where the other side intersects the protractor.
Do You Use The Top Or Bottom Numbers On A Protractor?
Use the top numbers on a protractor for angles opening to the right. Use the bottom numbers for angles opening to the left.
How Do You Find The Measurement Of An Angle?
Use a protractor to measure the angle. Place the midpoint on the vertex, align one side with zero, and read the degree.
How To Measure A 45 Degree Angle?
Use a protractor to measure a 45-degree angle. Align the baseline and mark at 45 degrees.
Conclusion
Measuring angles with a protractor is easy. Follow the steps carefully. Place the protractor correctly. Align it with the angle’s vertex. Read the measurement on the protractor. Practice to improve accuracy. This skill is useful in various fields. Geometry, engineering, and art benefit greatly.
Now, you can confidently measure angles. Keep your protractor handy. Happy measuring!

Rakib Sarwar is a seasoned professional blogger, writer, and digital marketer with over 12 years of experience in freelance writing and niche website development on Upwork. In addition to his expertise in content creation and online marketing, Rakib is a registered pharmacist. Currently, he works in the IT Division of Sonali Bank PLC, where he combines his diverse skill set to excel in his career.