
Using a theodolite for angle measurement is essential in surveying. It ensures precision in construction projects.
A theodolite is a sophisticated tool that measures both horizontal and vertical angles. It is vital for tasks where accuracy is paramount. Surveyors and engineers rely on it to map out land, build structures, and conduct research. Learning to use a theodolite correctly can seem challenging at first.
But with a clear guide, you can master the basics quickly. Understanding its components and functions will help you achieve precise measurements. This article will provide a step-by-step guide to using a theodolite effectively. Let’s explore how you can harness this tool for your next project.
Credit: blog.oureducation.in
Introduction To Theodolites
Theodolites help measure angles in surveying. Set up the theodolite on a tripod, ensuring it is level. Aim the telescope at your target and read the angle from the scale.
Theodolites are essential tools in surveying and construction. They help in measuring horizontal and vertical angles with precision. These instruments have been used for centuries and are still relevant today. Understanding how to use a theodolite can improve your surveying skills.Purpose Of A Theodolite
A theodolite serves a specific purpose. It measures angles between points on the ground. These measurements are crucial for mapping and construction projects. Accurate angle measurements ensure structures are built correctly. They also help in land surveying and boundary determination.Key Components
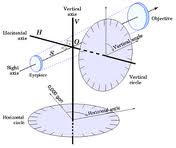
Theodolites have several key components. The telescope is used to sight the target. The horizontal and vertical circles measure the angles. The leveling base ensures the instrument is stable. The alidade allows the user to read the angles. These components work together to provide accurate measurements. “`Setting Up The Theodolite
Setting up a theodolite can seem tricky at first. But don’t worry. With a little practice, it becomes second nature. In this section, I’ll walk you through the steps to get your theodolite ready for measuring angles. Let’s dive in.
Choosing The Right Location
First things first. You need to pick a good spot for your theodolite. Here’s what to look for:
- Flat ground: Make sure the surface is even. This helps keep the theodolite stable.
- Clear view: Ensure there are no obstacles blocking your sight. You need a clear line of sight to your targets.
- Away from vibrations: Avoid places with lots of movement. Vibrations can mess up your readings.
Imagine setting up a tent. You wouldn’t choose a rocky hill, right? The same idea goes for your theodolite. Find a good, steady spot.
Stabilizing The Instrument
Now that you’ve found the perfect location, it’s time to stabilize the theodolite. Here’s how:
- Setup the tripod: Extend the tripod legs and plant them firmly into the ground. Make sure it’s level.
- Attach the theodolite: Secure the theodolite onto the tripod. Tighten the screws to keep it in place.
- Level the theodolite: Use the built-in bubble levels. Adjust the foot screws until the bubbles are centered.
Think of stabilizing the theodolite like setting a table. You want it to be steady so nothing falls off. Follow these steps, and your theodolite will be rock solid.
Setting up a theodolite isn’t rocket science. With the right location and proper stabilization, you’ll be ready to measure angles accurately. Happy surveying!
Calibrating The Theodolite
Hey friends, today we’re going to talk about something super useful: Calibrating the Theodolite. If you need to measure angles for surveying, construction, or mapping, you need a theodolite. But, before you can start using it, you have to make sure it is properly calibrated. This makes sure your measurements are accurate. Let’s dive into the process step-by-step!
Leveling The Theodolite
First things first, you need to level your theodolite. Think of it like balancing a see-saw. If it’s not level, your readings will be off. Here’s how you do it:
- Set up the tripod on firm ground. Make sure it’s stable.
- Attach the theodolite to the tripod. Tighten the screws.
- Look at the leveling screws at the base. These are your control points.
- Use the bubble level. Adjust the screws until the bubble is centered.
Done! Your theodolite is now leveled. It’s like having a flat playing field.
Adjusting The Crosshairs
Next, you need to adjust the crosshairs. The crosshairs are like the bullseye on a dartboard. They help you aim accurately. Follow these steps:
- Look through the telescope. Find a clear target. A distant object works best.
- Center the crosshairs on the target.
- Check the focus. Use the focusing knob to make the image sharp.
- Adjust the horizontal and vertical knobs. Make sure the crosshairs stay on the target even if you move your eye.
Easy, right? Now your crosshairs are set. You’re ready to start measuring angles!
And there you have it. Calibrating a theodolite might sound tricky, but it’s pretty simple once you break it down. Just remember: level your theodolite and adjust the crosshairs. Do these steps, and you’ll get accurate readings every time. Happy measuring!
Measuring Horizontal Angles
Hey friends, today I’m going to guide you on how to measure horizontal angles using a theodolite. It sounds complicated, but it’s really quite simple once you get the hang of it. A theodolite is a tool used in surveying and engineering that measures angles in the horizontal and vertical planes. So, let’s get started with the basics!
Aligning With Reference Point
First things first, we need to align the theodolite with a reference point. This is a crucial step because it ensures that our measurements are accurate. Imagine you’re setting up a camera on a tripod. You want to make sure it’s level and pointed at the right spot before you start taking photos. The same principle applies here.
- Set up your theodolite on a tripod over the specific point you want to measure from.
- Ensure the theodolite is level. Use the built-in spirit levels to make adjustments. This is like making sure your camera is steady before you click a photo.
- Look through the telescope and aim at your reference point. This could be a specific marker, a pole, or any fixed point in the distance.
- Lock the horizontal clamp to keep the theodolite steady once it’s aimed at the reference point.
And there you go! You are now aligned with your reference point.
Recording The Angle
Next up, let’s talk about recording the angle. This is where you’ll get the actual measurement. Think of it as noting down the score after a game. You want to make sure it’s accurate so you can use it later.
- With the theodolite locked on the reference point, read the initial angle on the horizontal circle. Note this down as your starting angle.
- Now, unlock the horizontal clamp and rotate the theodolite to your target point. This could be another marker or a specific point you need to measure the angle to.
- Lock the horizontal clamp again once you’re aimed at the target point.
- Read the new angle on the horizontal circle. The difference between this angle and your starting angle is your horizontal angle measurement.
It’s as simple as that! Recording the angle might seem tricky at first, but with practice, you’ll get the hang of it. Remember, accurate readings depend on a steady hand and a clear line of sight.
To sum it up, measuring horizontal angles with a theodolite involves two main steps: aligning with a reference point and recording the angle. It’s like setting up a camera and taking a precise shot. Easy, right? Keep practicing, and you’ll become a pro in no time!
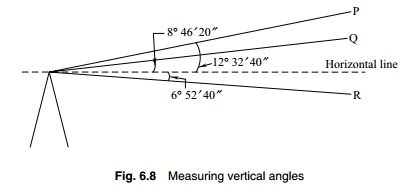
Measuring Vertical Angles
Understanding vertical angles is crucial for many surveying tasks. Theodolites help measure these angles with high precision. This section will guide you through the steps of measuring vertical angles using a theodolite.
Setting The Vertical Circle
First, set up the theodolite on a tripod. Ensure the tripod is stable. Use the leveling screws to level the instrument. This step is important for accurate readings. Look through the theodolite’s telescope. Align the crosshairs with a reference point. This reference point can be a known vertical line.
Next, set the vertical circle to zero. Use the vertical circle clamp to hold it in place. Check the alignment again. Adjust if needed. Now, you are ready to take measurements.
Taking The Measurement
To measure a vertical angle, first sight the lower point. Use the telescope to find this point. Once found, lock the telescope in place. Note the reading on the vertical circle. This is your initial angle.
Next, sight the upper point. Adjust the telescope to find this point. Again, lock the telescope in place. Note the new reading on the vertical circle. This is your final angle. The difference between the two readings is your vertical angle.
Repeat the process to ensure accuracy. Record the measurements for future reference. Practice makes perfect. With time, you will measure vertical angles quickly and accurately.
Credit: www.brainkart.com
Advanced Techniques
Using a theodolite for angle measurement requires precision and skill. Advanced techniques can improve accuracy and efficiency. Here, we explore two essential methods.
Using Repetition Method
The repetition method enhances the accuracy of angle measurements. Start by setting up the theodolite at a fixed point. Measure the angle multiple times. Record each measurement carefully. Average the results to get the final angle. This method reduces random errors. It ensures consistent readings.
Reducing Errors
Minimizing errors is crucial for precise measurements. Check the theodolite’s calibration before use. Ensure the instrument is level. Use a plumb bob for accurate positioning. Avoid parallax by keeping your eye level with the reading scale. Adjust the focus to get a clear view. Regularly clean the lenses and mirrors. Avoid using the theodolite in extreme weather conditions. Follow these steps to maintain accuracy.
Common Mistakes
Incorrect leveling and improper sight alignment are common mistakes when using a theodolite for angle measurement. Always ensure the instrument is stable and the line of sight is accurate.
Using a theodolite for angle measurement requires precision. Many beginners make common mistakes that affect accuracy. These errors can lead to incorrect data and flawed results. Understanding these mistakes helps improve your skills and accuracy.Incorrect Leveling
One common mistake is incorrect leveling. The theodolite must be perfectly level before taking measurements. If not, the angles will be wrong. Check the bubble levels carefully. Adjust the leveling screws until the bubbles are centered. Even a small tilt can cause errors. Take your time to ensure the theodolite is level.Misreading Angles
Misreading angles is another frequent mistake. Always read the angle from the correct side of the scale. Double-check your readings to avoid mistakes. Use the magnifying glass if needed for a clearer view. Record the readings accurately. Even a small error can lead to significant mistakes in your calculations. Practice reading angles until you are confident. “`Maintenance Tips
Hey there! So, you’ve got a theodolite and you’re keen to keep it in tip-top shape? Great! Regular maintenance is key to ensuring it works perfectly every time you need it. Let’s dive into some simple maintenance tips to keep your theodolite in excellent condition. We’ll talk about cleaning and calibration, which are super important for precise measurements. Ready? Let’s go!
Cleaning The Theodolite
First things first, keeping your theodolite clean is crucial. Dirt and dust can mess with its accuracy. Here’s how you can clean it properly:
- Use a soft brush to remove dust from the surfaces. This prevents scratches.
- For the lenses, use a lens cleaning solution and a microfiber cloth. Gently wipe the lenses to avoid smudges.
- Check the moving parts. Wipe them with a clean, dry cloth to remove any debris.
Remember, never use harsh chemicals. They can damage the sensitive parts of the theodolite. I once made the mistake of using a regular cleaning spray on my theodolite, and it didn’t end well. So, stick to the right materials!
Regular Calibration
Calibration is like a health check-up for your theodolite. It ensures the readings are accurate. Here’s how you can do it:
- Set up the theodolite on a stable tripod. Make sure it’s level.
- Use a known reference point. This could be a marked spot you’ve used before.
- Adjust the horizontal and vertical scales. They should match the reference point exactly.
- Repeat the process a few times. This ensures consistency.
Sometimes, it’s best to get a professional to calibrate it. If you notice any persistent errors, don’t hesitate to seek help. Better safe than sorry!
So, there you have it! Keep your theodolite clean and regularly calibrated, and it will serve you well. Trust me, these steps are simple but make a huge difference. Happy measuring!

Credit: www.youtube.com
Frequently Asked Questions
How Do You Use Theodolite Step By Step?
Set up the tripod and mount the theodolite. Level the instrument using foot screws. Align the theodolite with a reference point. Measure the horizontal and vertical angles. Record the readings accurately.
How Accurate Is A Theodolite Angle?
A theodolite can measure angles with an accuracy of up to 0. 1 arc-seconds, depending on the model and calibration.
How Do You Measure Included Angle By Theodolite Traversing?
To measure the included angle by theodolite traversing, set up the theodolite at the vertex. Record the bearings of both lines. Subtract the smaller bearing from the larger bearing. The result is the included angle.
How To Measure Angles In Surveying?
To measure angles in surveying, use a theodolite or total station. Position the instrument accurately. Align with the target point. Record the angle reading.
Conclusion
Using a theodolite for angle measurement is simple with practice. First, set up the theodolite properly. Next, ensure accurate leveling. Then, align the instrument with your target. Carefully read the angles. Record your measurements systematically. Regular practice improves your skills.
A theodolite offers precise angle data. This is essential for surveying and construction tasks. Remember to maintain your equipment. Proper care ensures long-lasting accuracy. Follow these steps, and you’ll measure angles like a pro. Happy measuring!

Rakib Sarwar is a seasoned professional blogger, writer, and digital marketer with over 12 years of experience in freelance writing and niche website development on Upwork. In addition to his expertise in content creation and online marketing, Rakib is a registered pharmacist. Currently, he works in the IT Division of Sonali Bank PLC, where he combines his diverse skill set to excel in his career.